
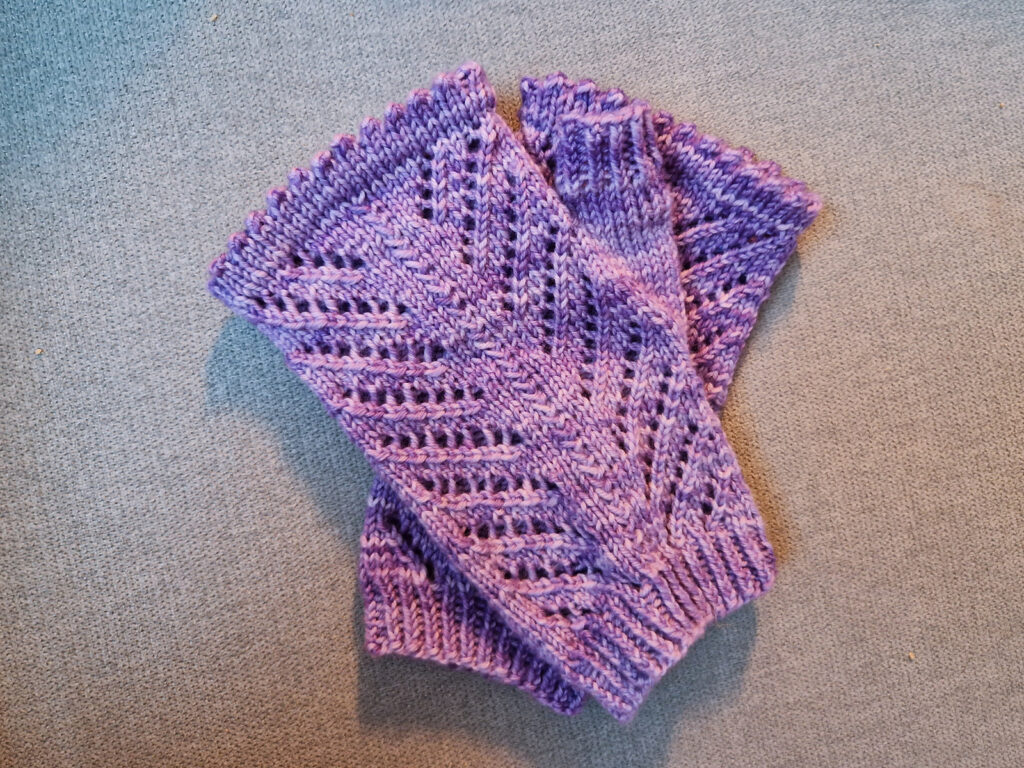
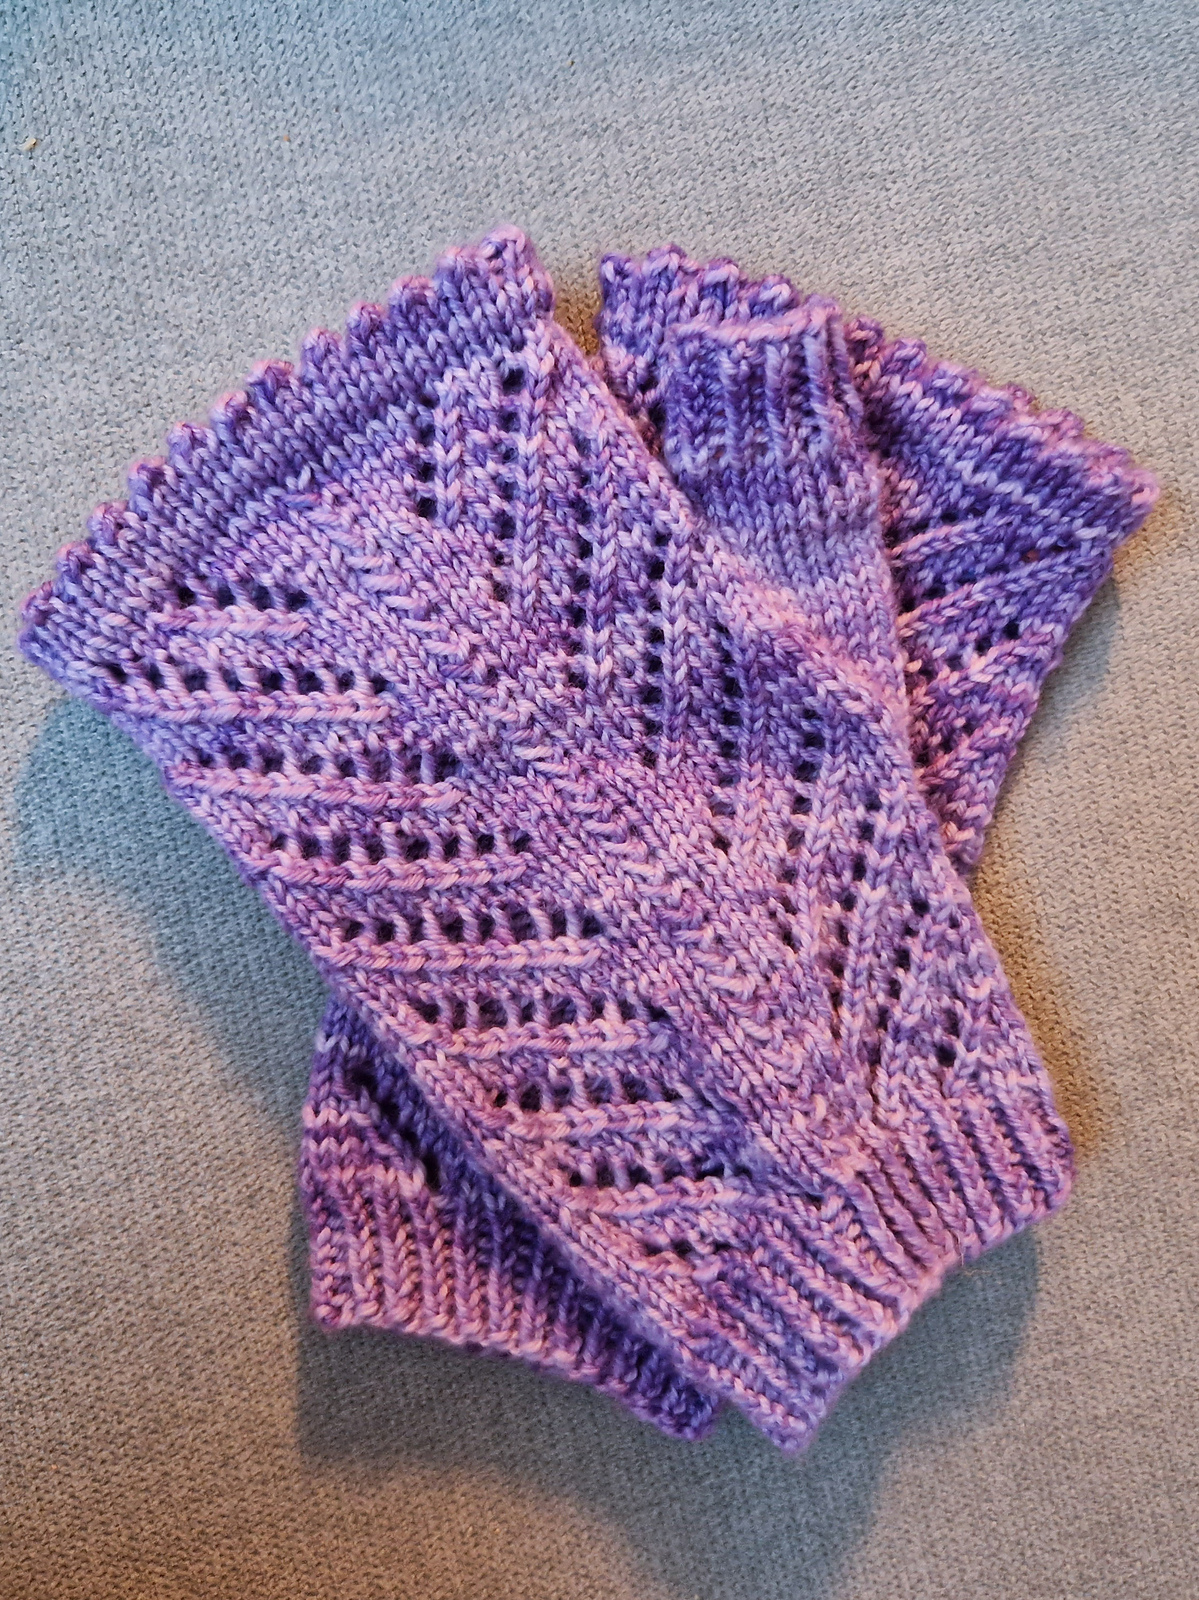
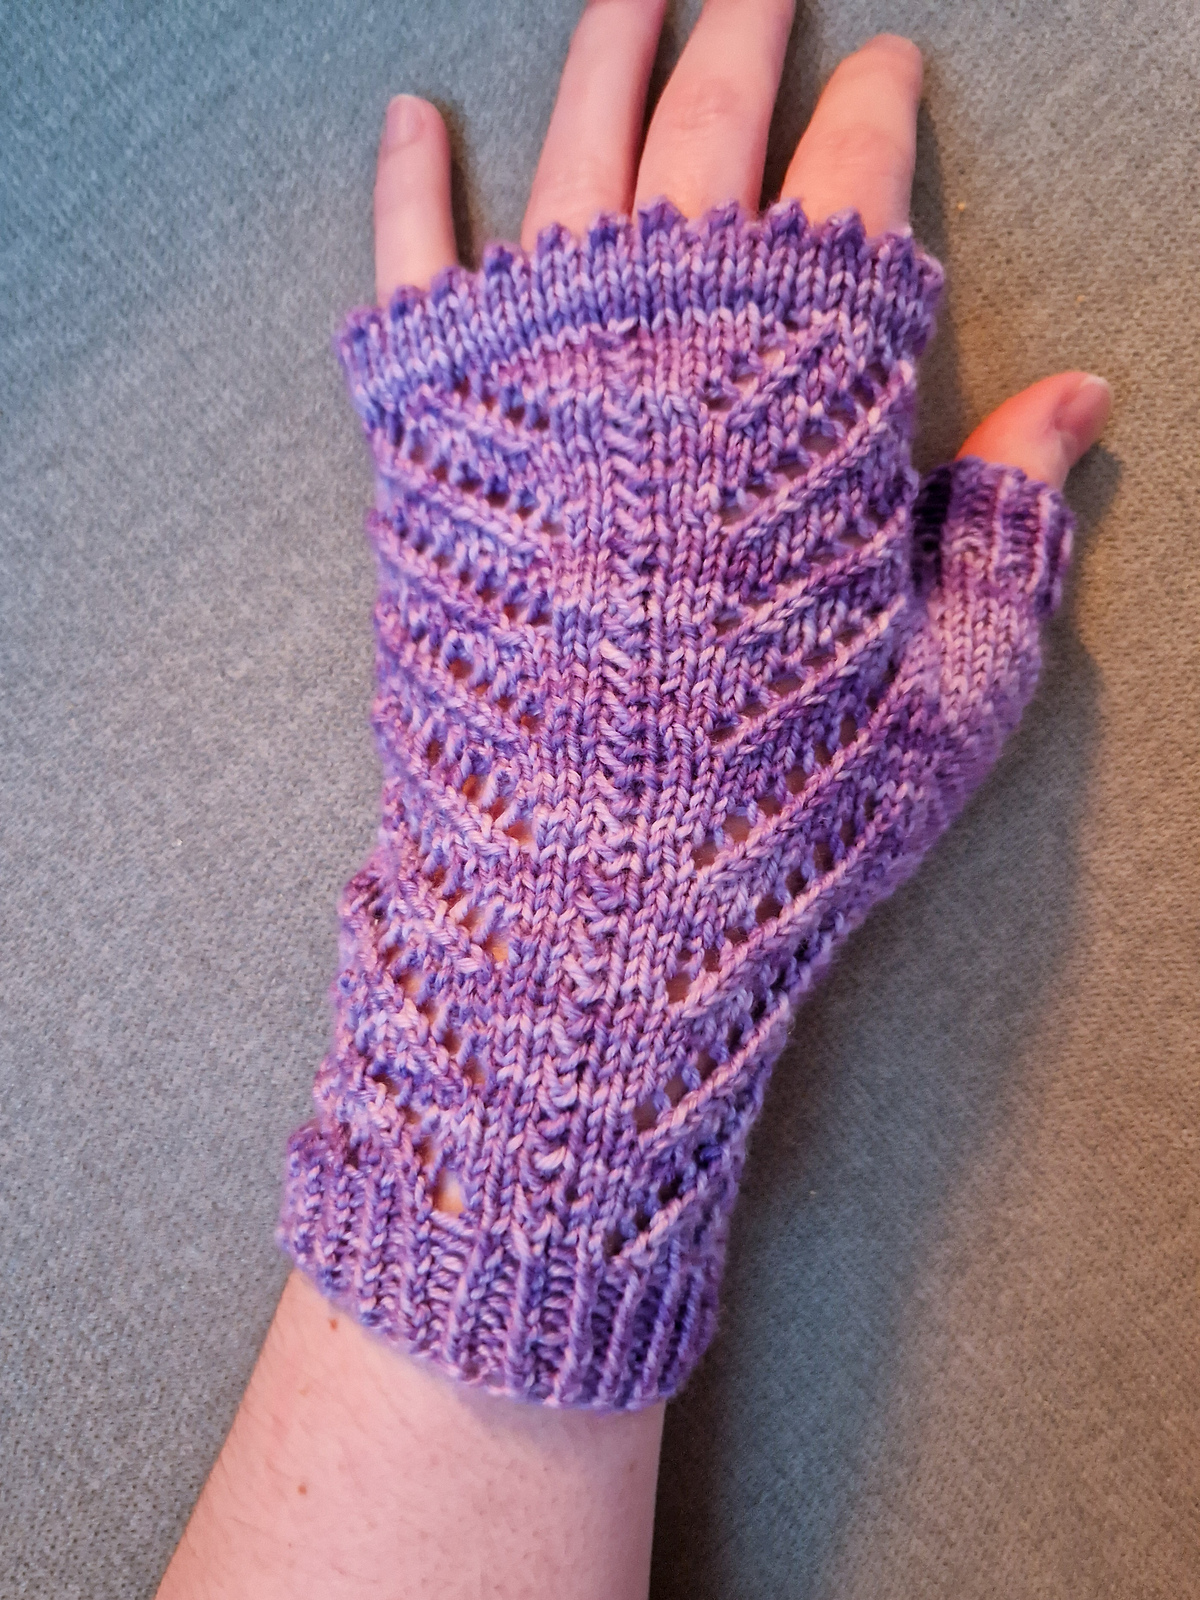
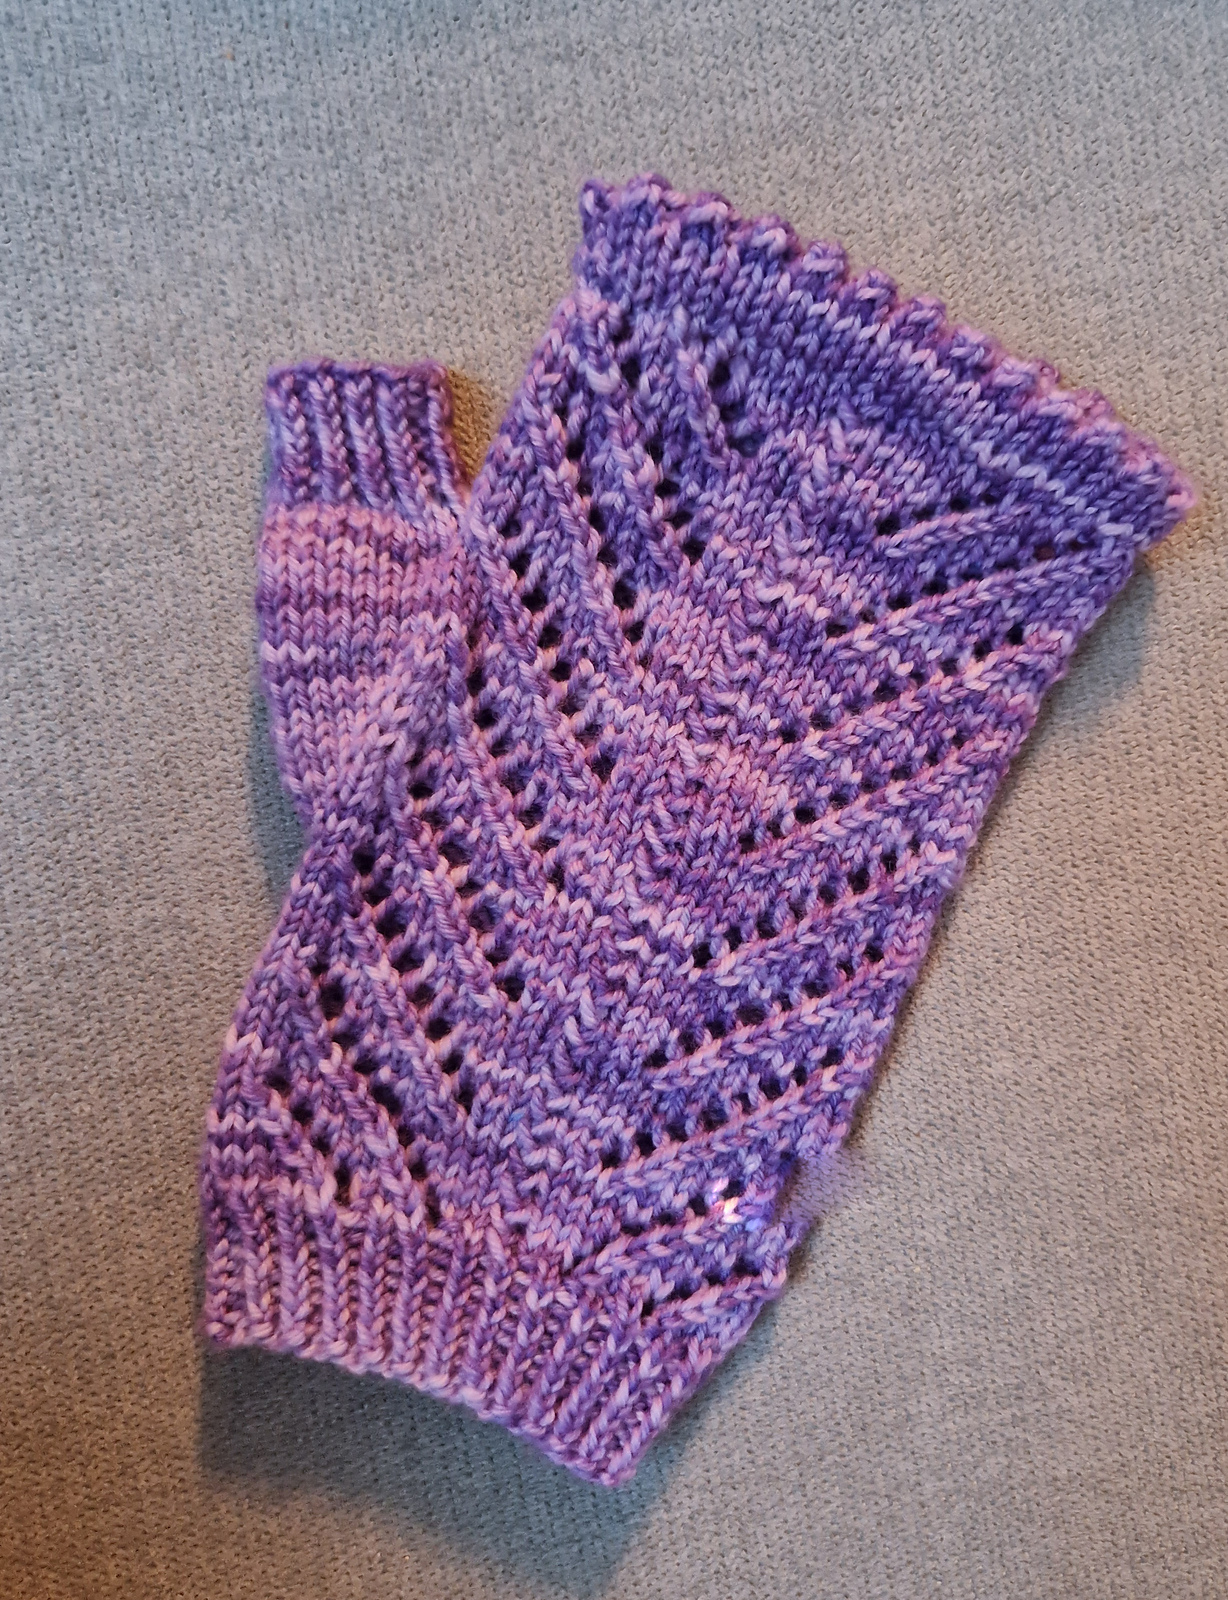
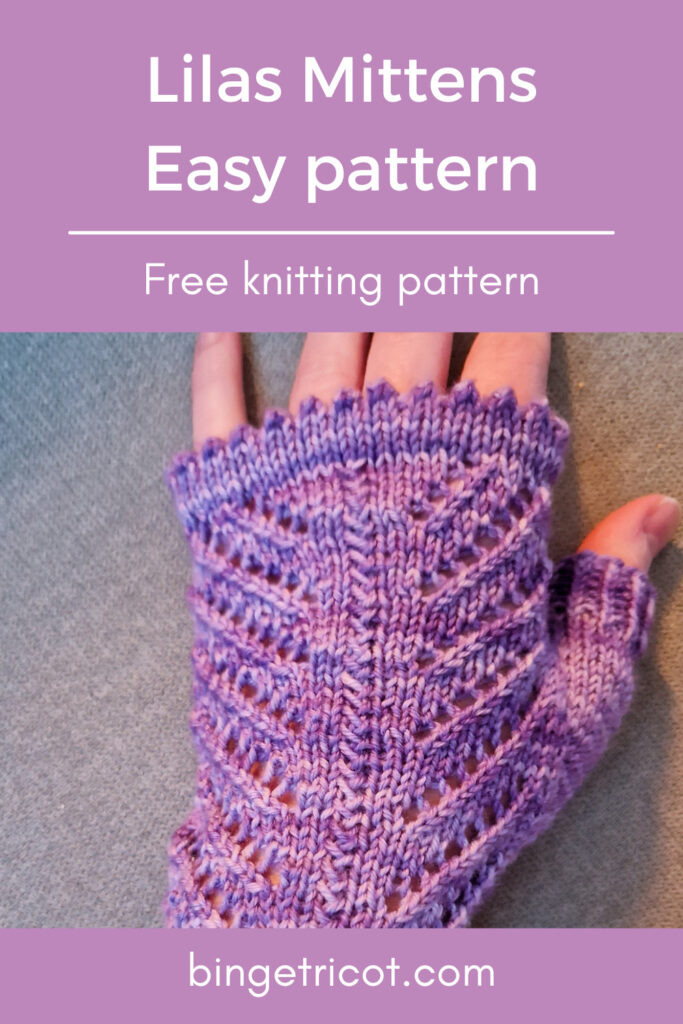
The Lilas fingerless mittens, free knitting pattern for lace fingerless mittens
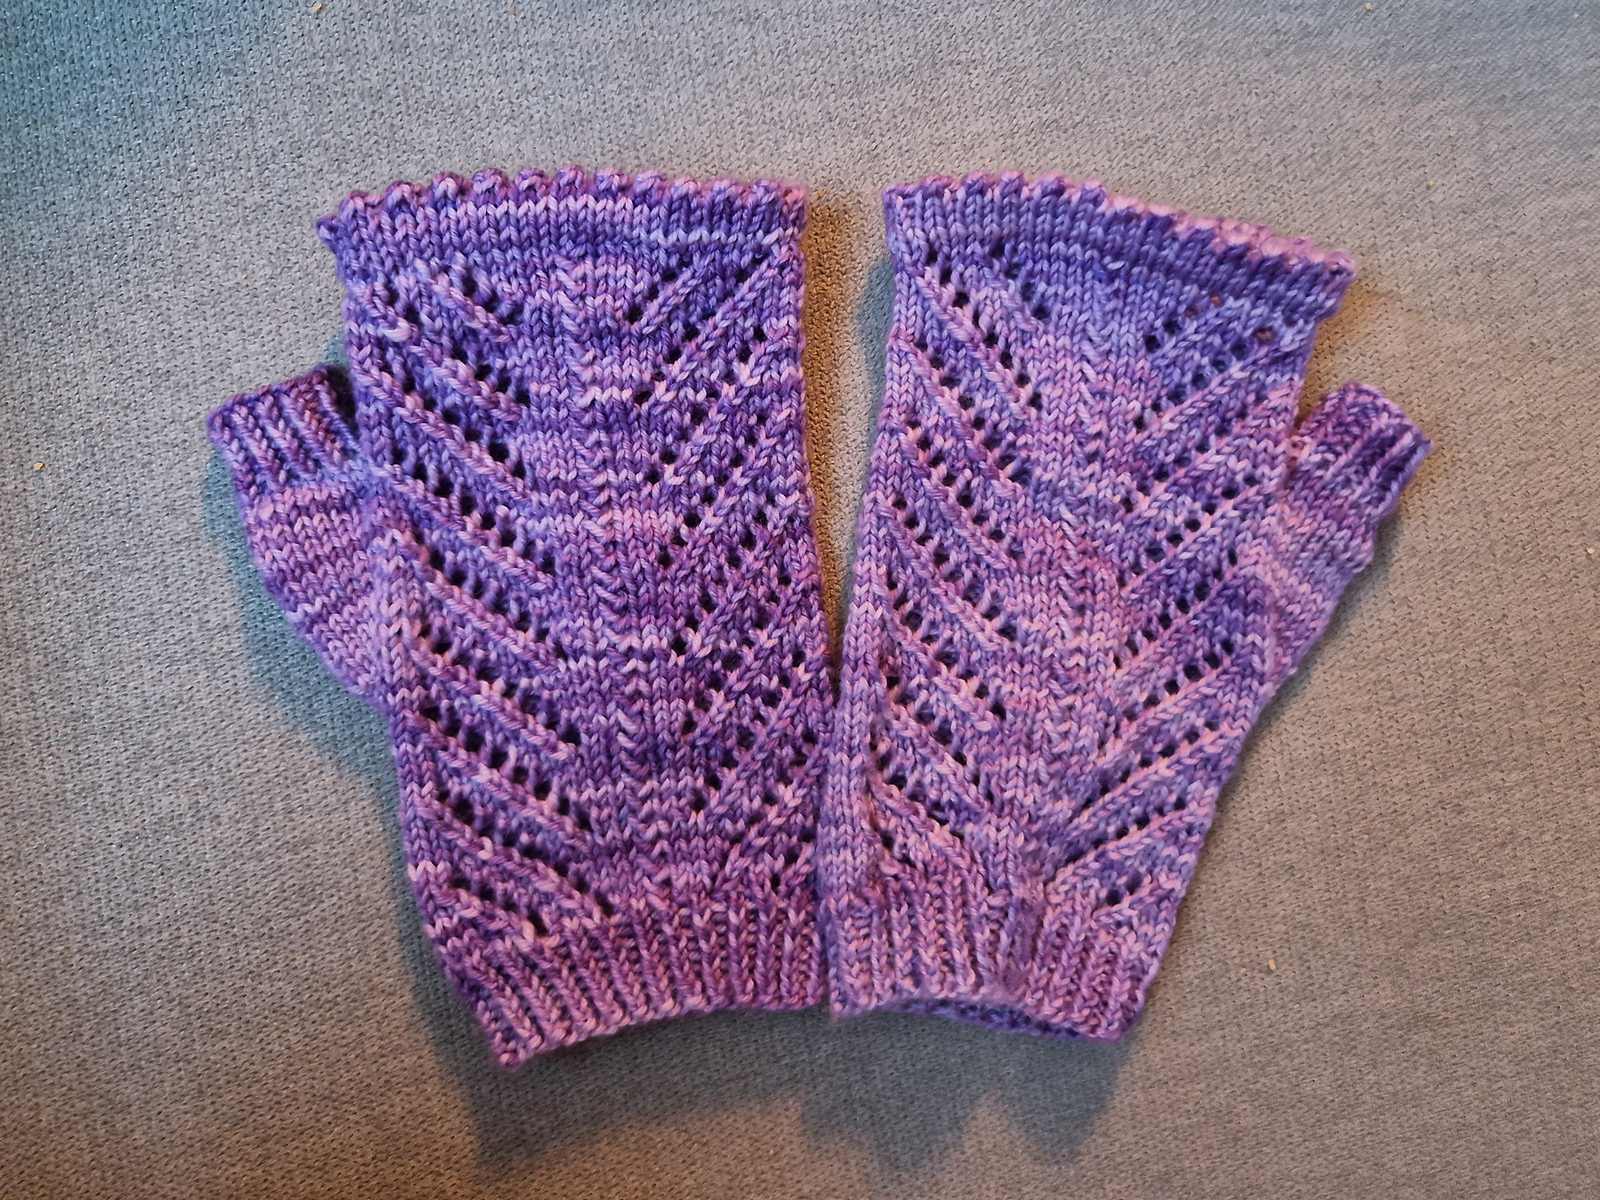
Hello ! Winter is coming soon, and we need to think about warming up our little hands and those of our loved ones. So it’s the perfect time to offer you a new free knitting pattern for mittens! Here are the Lilas fingerless mitts. It’s a circular knitting pattern for lace mittens. Keep reading to find out how to make these pretty fingerless mitts!
The story of the Lilas knitted fingerless mittens
Last year, I fell in love with an amazing yarn advent calendar by Une maille à la fois. And in this calendar, there were two mini skeins (20g) of the same color. I immediately thought of using them for pretty mittens. I wanted to use stockinette and lace to highlight this fine yarn in shades of purple.
So I tried out a few pattern ideas, with the idea of starting with a resemblance to lilac (lilas in French). Indeed, that’s what the beautiful color of my skeins immediately brought to mind. Lilac flowers are often found in purple/pink tones, in shrub form. They bloom in spring and produce beautiful, bushy, elongated stems.
Techniques used in the pattern
In this fingerless mitts pattern (knitted in the round) there’s stockinette, lace, twisted ribbing, increases and decreases, and a picot hem. As with all my patterns, I’ve tried to think up a design that’s not too complicated to make, but that also lets you learn new things!
I think this is the most complex of my free patterns so far. But there’s nothing too complicated about it. In my opinion, it’s accessible to anyone who’s ever done a bit of knitting in the round.
In the « Stitches and techniques used » section, you’ll find information on the techniques and abbreviations mentioned in the pattern. If anything is missing, please let me know!
Ressources I used to design the pattern
- I found the crossed stitch explanation in the book « Point par point » by Laura Valfort.
- I tried many lace patterns using Stitch Fiddle. I based my tries on the fact that I know for my hands I need to cast on between 50 and 54 stitches for a fingering mitten. I wanted something lacy but with also a bit of « relief ».
- I fell in love with the twisted rib after knitting the Dandelion cardigan by Along avec Anna. I’m basically using it almost all the time now.
- I imagined using a different thumb/gusset style, but I thought the simplest one went best with the lace pattern. I notably used videos on YouTube and this very good article explaining the mitten anatomy: https://www.interweave.com/article/knitting/mitten-anatomy-thumb-gusset/
- I have discovered the picot hem by knitting the Samedi Paillettes socks.
How to read the pattern?
You’ve already read the story of the pattern. Now I’ll tell you how to find all the information you need to knit these pretty mittens. It’s all here, on this page. And the novelty of this pattern is that I’ve tried to make little explanation videos for you! In any case, if you have any questions, don’t hesitate to contact me!
Explanations are given row by row. I also give you the diagram for the main pattern. For some technical points, videos are available on my Youtube channel.
Materials needed for your knitted mittens
- 40g (2 mini skeins) of Mini Merinos by Une Maille à la fois (or equivalent yarn: fingering, 2.5-3mm)
- 3mm circular ou double-pointed knitting needles. The pattern is written for knitting in the round. But as it is mainly knitted in stockinette, I guess it can easily be adapted for straight needles.
- Stitch markers (or paper clips, bits of wool)…
- A tapestry needle
Stitches and techniques used
k: knit
p: purl
Twisted rib: *knit 1 through the back loop, purl 1*. Here is a quick video showing you the twisted ribbing.
k2tog : knit 2 stitches together (1 stitch decrease)
YO: yarn over : place the yarn in front of the work before knitting the next stictch (1 stitch increase).
SSK: slip 1 stitch knitwise, slip another stitch knitwise, knit the 2 slipped stitches together through the back loop (1 stitch decrease).
PM: place marker. This step is not compulsory, but it can help you identify the thumb increases.
SM: slip marker
M1R: Make 1 right: Using the left needle, lift the yarn between the 2 stitches, picking it up from the back of the knitting. With the right needle, knit this new stitch as a regular knit stitch.
M1L: Make 1 left: Using the left needle, lift the yarn between the 2 stitches, picking it up from the front of the knitting. With the right needle, knit this new stitch through the back loop.
- Here is a video showing you how to make the M1R and M1L for the thumb of the mittens: https://youtu.be/YLcxQVcEtBo
Crossed stitch: slip 1 purlwise, knit 1, Yarn over, pass the slipped stitch over the knit stitch and the yarn over.
This is a 2 row stitch. Here, I’ve only indicated it on odd rows because, as we’re knitting in a circular pattern, row 2 is always just knit stitches. If you want to use it again with straight needles, you’ll have to purl all the way on row 2.

Cast on techniques:
- German twisted cast on: For an elastic cast on, I usually use the German Twisted Cast on. You can also use whatever cast on method you prefer, as long as it is not too tight. Here is a video showing you the German Twisted cast on.
- When you separate the thumb from the mitten, you need to cast on 2 new stitches. You can use the knitted cast on, or the backwards loop method.
- In the first row of the thumb, you need to pick up and knit 2 stitches on each side, to avoid potential holes. Here is a video that show how to do this (the video is for a sleeve on a sweater, but it works the same here.
How to knit the Lilas knitted fingerless mittens
Are you ready to knit? Do you have everything you need? Let’s get knitting! The two hands are knit separately.
Important information: This is free pattern has been tested and proofread only by me. There might be mistakes here and there. Please let me know in the comment section if you have any problem.
1 – Cast on and twisted ribbing edge
- Cast on 52 stitches with the 3mm needles and your favourite method ( as indicated above, I recommand the German Twisted cast on). Join in the round.
- Knit 8 rows in twisted rib.
2 – Wrist (Main pattern)
Here, you’ll be using the main lace pattern, which is knitted on 8 rows. You can use the diagram below, or the written explanations. The lace pattern is used for the back of the hand. The inside of the hand is in stockinette.
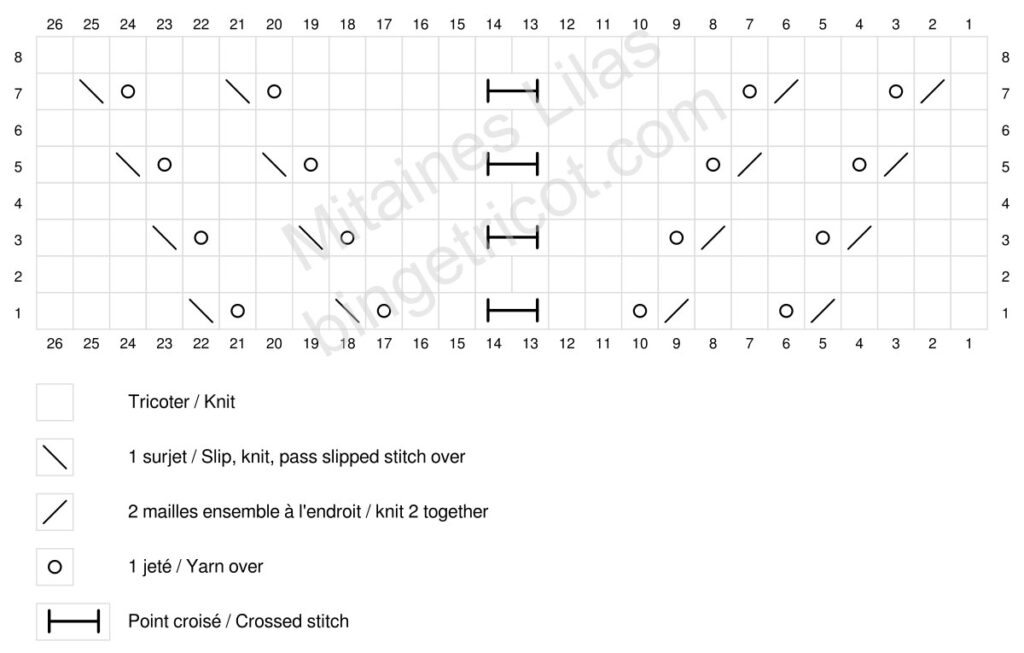
Row 1: k4, K2tog, YO, k2, k2tog, YO, k2, crossed stitch (slip, k1, YO, pass slipped stich over), k2, YO, SSK, k2, YO, SSK, k4, k26 (These 26 stitches are those on the inside of the hand. They are knitted in stockinette).
Rows 2, 4, 6 and 8: Knit all stitches. Useful tip: knit the SSK of the previous row through the back loop for a neater result.
Row 3: k3, k2tog, YO, k2, k2tog, YO, k3, crossed stitch, k3, YO, SSK, k2, YO, SSK, k3, k26.
Row 5: k2, k2tog, YO, k2, k2tog, YO, k4, crossed stitch, k4, YO, SSK, k2, YO, SSK, k2, k26.
Row 7: k1, k2tog, YO, k2, k2tog, YO, k5, crossed stitch, k5, YO, SSK, k2, YO, SSK, k1, k26.
Repeat these 8 rows 3 times in total (24 rows). Then, you will work the thumb increases. Choose the explanation corresponding to the hand you are knitting.
3 – Thumb increases (right hand)
Row 1: k4, K2tog, YO, k2, k2tog, YO, k2, crossed stitch (slip, k1, YO, pass slipped stich over), k2, YO, SSK, k2, YO, SSK, k4, PM, M1R, k2, M1L, PM, k24. (54 stitches)
Rows 2, 4, 6, 8, 10, 12, 14, 16, 18 and 20: Knit all stitches. Useful tip: knit the SSK of the previous row through the back loop for a neater result.
Row 3: k3, k2tog, YO, k2, k2tog, YO, k3, crossed stitch, k3, YO, SSK, k2, YO, SSK, k3, SM, M1R, k4, M1L, SM, k24. (56 stitches)
Row 5: k2, k2tog, YO, k2, k2tog, YO, k4, crossed stitch, k4, YO, SSK, k2, YO, SSK, k2, SM, M1R, k6, M1L, SM, k24. (58 stitches)
Row 7: k1, k2tog, YO, k2, k2tog, YO, k5, crossed stitch, k5, YO, SSK, k2, YO, SSK, k1, SM, M1R, k8, M1L, SM, k24. (60 stitches)
Row 9: k4, K2tog, YO, k2, k2tog, YO, k2, crossed stitch, k2, YO, SSK, k2, YO, SSK, k4, SM, M1R, k10, M1L, SM, k24. (62 stitches)
Row 11: k3, k2tog, YO, k2, k2tog, YO, k3, crossed stitch, k3, YO, SSK, k2, YO, SSK, k3, SM, M1R, k12, M1L, SM, k24. (64 stitches)
Row 13: k2, k2tog, YO, k2, k2tog, YO, k4, crossed stitch, k4, YO, SSK, k2, YO, SSK, k2, SM, M1R, k14, M1L, SM, k24. (66 stitches)
Row 15: k1, k2tog, YO, k2, k2tog, YO, k5, crossed stitch, k5, YO, SSK, k2, YO, SSK, k1, SM, k16, SM, k24.
Row 17: k4, K2tog, YO, k2, k2tog, YO, k2, crossed stitch, k2, YO, SSK, k2, YO, SSK, k4, SM, k16, SM, k24.
Row 19: k3, k2tog, YO, k2, k2tog, YO, k3, crossed stitch, k3, YO, SSK, k2, YO, SSK, k3, SM, k16, SM, k24.
You have now repeated the main pattern 2.5 times and added 14 stitches for the thumb on the left side of the mitten. There are 66 stitches in total on the needles (26 for the main pattern, 16 for the thumb, and 24 for the inside).
Next row (row 5 of pattern): k2, k2tog, YO, k2, k2tog, YO, k4, crossed stitch, k4, YO, SSK, k2, YO, SSK, k2,. Place 16 on hold and remove markers, cast on 2 new stitches (to fill the hole and hav 26 stitches for the inside again), k24.
3 (bis) – Thumb increases (right hand)
Row 1: k4, K2tog, YO, k2, k2tog, YO, k2, crossed stitch (slip, k1, YO, pass slipped stich over), k2, YO, SSK, k2, YO, SSK, k4. k24, PM, M1R, k2, M1L, PM. (54 stitches)
Rows 2, 4, 6, 8, 10, 12, 14, 16, 18 and 20: Knit all stitches. Useful tip: knit the SSK of the previous row through the back loop for a neater result.
Row 3: k3, k2tog, YO, k2, k2tog, YO, k3, crossed stitch, k3, YO, SSK, k2, YO, SSK, k3. k24, SM, M1R, k4, M1L, SM. (56 stitches)
Row 5: k2, k2tog, YO, k2, k2tog, YO, k4, crossed stitch, k4, YO, SSK, k2, YO, SSK, k2. k24, SM, M1R, k6, M1L, SM. (58 stitches)
Row 7: k1, k2tog, YO, k2, k2tog, YO, k5, crossed stitch, k5, YO, SSK, k2, YO, SSK, k1. k24, SM, M1R, k8, M1L, SM. (60 stitches)
Row 9: k4, K2tog, YO, k2, k2tog, YO, k2, crossed stitch, k2, YO, SSK, k2, YO, SSK, k4. k24, SM, M1R, k10, M1L, SM. (62 stitches)
Row 11: k3, k2tog, YO, k2, k2tog, YO, k3, crossed stitch, k3, YO, SSK, k2, YO, SSK, k3. k24, SM, M1R, k12, M1L, SM. (64 stitches)
Row 13: k2, k2tog, YO, k2, k2tog, YO, k4, crossed stitch, k4, YO, SSK, k2, YO, SSK, k2. k24, SM, M1R, k14, M1L, SM. (66 stitches)
Row 15: k1, k2tog, YO, k2, k2tog, YO, k5, crossed stitch, k5, YO, SSK, k2, YO, SSK, k1. k24, SM, k16, SM.
Row 17: k4, K2tog, YO, k2, k2tog, YO, k2, crossed stitch, k2, YO, SSK, k2, YO, SSK, k4. k24, SM, k16, SM.
Row 19: k3, k2tog, YO, k2, k2tog, YO, k3, crossed stitch, k3, YO, SSK, k2, YO, SSK, k3. k24, SM, k16, SM.
You have now repeated the main pattern 2.5 times and added 14 stitches for the thumb on the right side of the mitten. There are 66 stitches in total on the needles (26 for the main pattern, 16 for the thumb, and 24 for the inside).
Next row (row 5 of pattern): k2, k2tog, YO, k2, k2tog, YO, k4, crossed stitch, k4, YO, SSK, k2, YO, SSK, k2. k24, Place 16 on hold and remove markers, cast on 2 new stitches (to fill the hole and hav 26 stitches for the inside again).
4 – Hand (Main pattern)
Keep working in main pattern for 20 rows (2.5 repeats). Detailed rows below:
Row 1 (row 5 of pattern): You’ve already knitted it! It’s the one where you put the thumb stitches on hold.
Row 2 and all even rows: Knit all stitches. Useful tip: knit the SSK of the previous row through the back loop for a neater result.
Row 3 (row 7 of pattern): k1, k2tog, YO, k2, k2tog, YO, k5, crossed stitch, k5, YO, SSK, k2, YO, SSK, k1, k26.
Row 5 (row 1 of pattern): k4, K2tog, YO, k2, k2tog, YO, k2, crossed stitch, k2, YO, SSK, k2, YO, SSK, k4, k26.
Row 7 (row 3 of pattern): k3, k2tog, YO, k2, k2tog, YO, k3, crossed stitch, k3, YO, SSK, k2, YO, SSK, k3, k26.
Row 9 (row 5 of pattern): k2, k2tog, YO, k2, k2tog, YO, k4, crossed stitch, k4, YO, SSK, k2, YO, SSK, k2, k26.
Row 11 (row 7 of pattern): k1, k2tog, YO, k2, k2tog, YO, k5, crossed stitch, k5, YO, SSK, k2, YO, SSK, k1, k26.
Row 13 (row 1 of pattern): k4, K2tog, YO, k2, k2tog, YO, k2, crossed stitch, k2, YO, SSK, k2, YO, SSK, k4, k26.
Row 15 (row 3 of pattern): k3, k2tog, YO, k2, k2tog, YO, k3, crossed stitch, k3, YO, SSK, k2, YO, SSK, k3, k26.
Row 17 (row 5 of pattern): k2, k2tog, YO, k2, k2tog, YO, k4, crossed stitch, k4, YO, SSK, k2, YO, SSK, k2, k26.
Row 19 (row 7 of pattern): k1, k2tog, YO, k2, k2tog, YO, k5, crossed stitch, k5, YO, SSK, k2, YO, SSK, k1, k26.
5 – Top edge
The top edge of the mittens is made with a picot hem. If you don’t like it, you can also replace this border with 6 rows of twisted ribbing.
Rows 1 to 5: knit all stitches.
Row 6: Repeat *k2tog, YO*.
Rows 7 to 11: knit all stitches.
Then bind off the stitches and fold over the edge, and sew the top edge to the inside of the mitten.
Here is a video showing how to do the picot hem.
6 – Knit the thumb (do this for both mittens)
First, put the 16 stitches on hold back on your needles, with 8 stitches on each needle. The beginning of the row must be on the inside of the mitten (inside the thumb).
Row 1: Pick up and knit 2 stitches in the left side of hole of the thumb, k16, pick up and knit 2 stitches in the left side of hole of the thumb. (20 stitches)
Here is a video showing you how to pick up and knit stitches like this. This technique is also very useful for the sleeves of a sweater, for example!
Rows 2 to 6: knit all stitches.
Rows 7 to 12: Knit 6 rows in twisted ribbing.
To finish the thumb, cast off the stitches, and fill any remaining holes with the beginning thread.
7 – Finishing
Weave in all the ends, and try on your mittens!
You can block them to even out the pattern and reveal the lace even better.
And that’s it! You now have beautiful fingerless mittens to wear!
Thank you for following this knitting fingerless mittens pattern! N’hésitez pas à me faire part de vos retours dans les commentaires (en bas de la page).
You can share your projects with the hashtags #mitaineslilas #bingetricot and #lilasfingerlessmitts
Don’t forget to add your projects on Ravelry!
Do you want more patterns like this one? Fill in this quick survey to help me find out what you would like!

Cet article original est publié sur https://bingetricot.com/
Toute reproduction, même partielle, est interdite sans l'autorisation de la rédactrice.

